彩蛋来了 写在前面,最近打算学习vue3.0 相关知识,本着学习一个东西,最好方法就是模仿写一个,所以自己动手写了一个简化版vue3.0,自己称作mini-vue3.0 感觉对vue3.0 或者 vue2.x核心原理的理解有很大帮助,所以分享出来。mini-vue3.0主要包括:模板编译、响应式、组件渲染过程等, 仓库地址mini-vue3.0,欢迎star
组件渲染原理
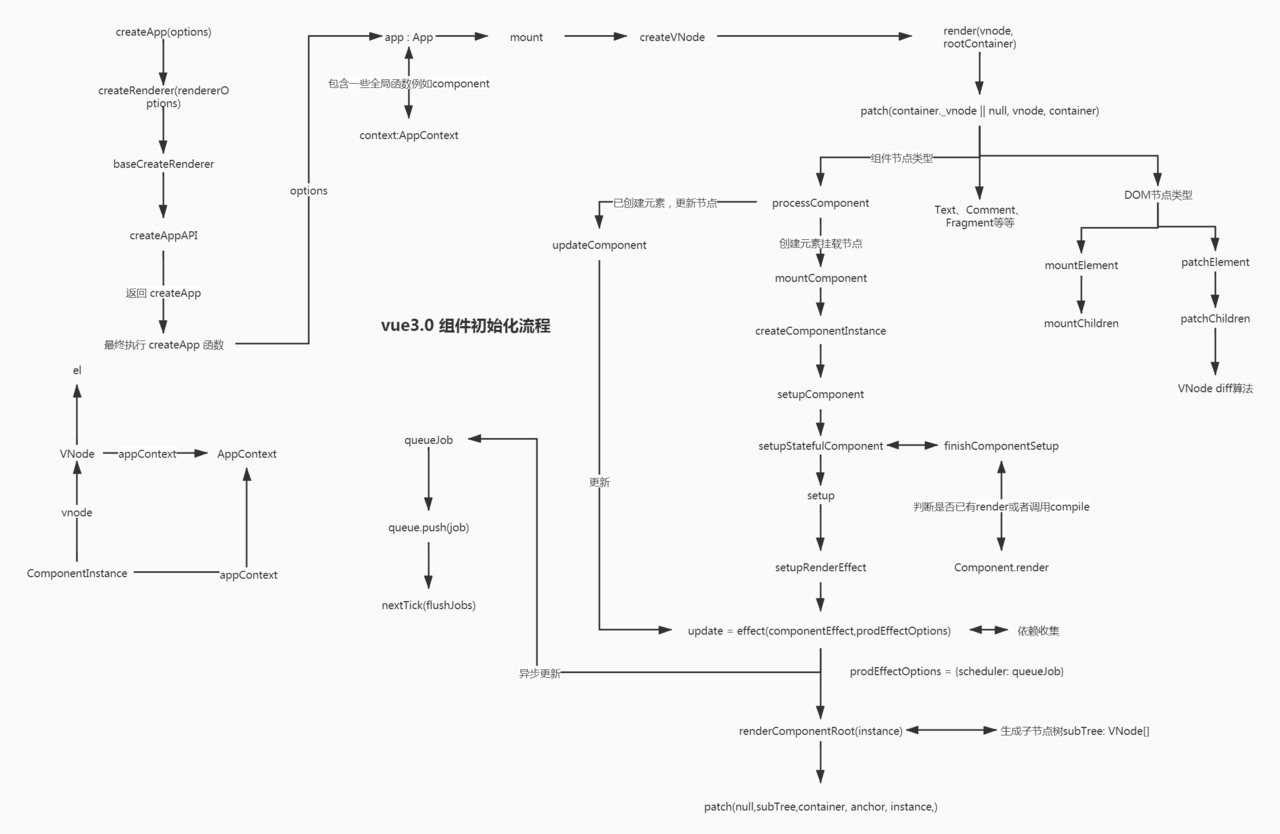
本文简单介绍vue3.0 组件的渲染过程,为了更好说明组件渲染原理,本文会结合一个简单的例子来说明整个过程。
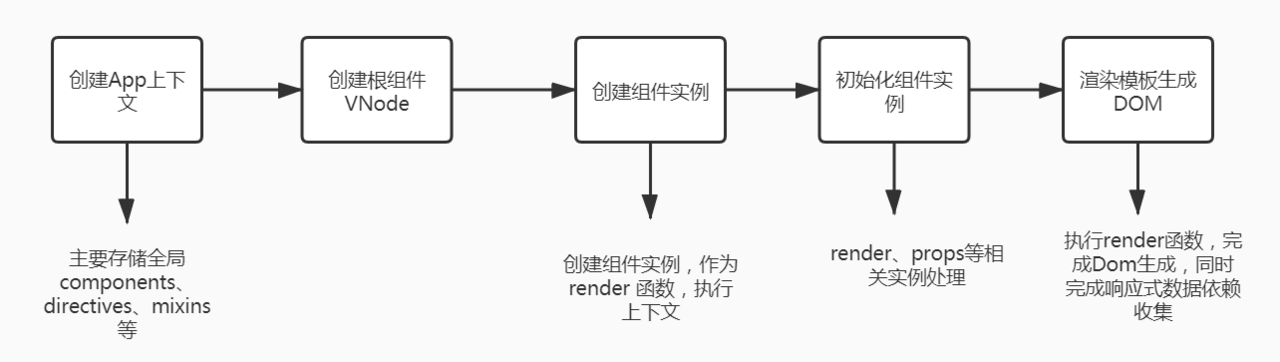
简单一点渲染过程图
复杂一点渲染过程图
设挂载点为
<div id="app"></div>
复制代码
根组件定义为
const rootComponent = {
  template: `<div class="parent">
                <div :class="data.class">组件渲染内容</div>
            </div>`,
    setup() {
      // reactive 作用是设置数据响应式
      const data = reactive({
        class: 'demo'
      })
      return {
        data
      }
    }
}
复制代码
创建App全局上下文
首先创建App全局上下文,创建的上下文如下:
const appContext = {
  mixins: [], // 存储全局mixins
  components: {}, // 存储全局组件
  directives: {}, // 存储全局指令
}

复制代码
创建组件VNode
const rootVnode = {
  type: rootComponent, // type的值可为字符串例如:div 或者 组件options对象
  props: {},
  children: {},
  component: null, // 组件实例
  appContext: appContext // 全局上下文,
}

复制代码
appContext: 全局上下文中的全局组件、指令,会在render函数执行时候,生成组件VNode时,用于解析全局组件、指令 type: 如果是普通DOM元素,则为字符串;如果为组件节点则为组件定义对象。在我们例子,为一个组件定义对象
根据VNode渲染根组件
创建组件实例
根据组件VNode 初始化组件实例instance
  const instance = {
    vnode: rootVnode,// 组件vnode
    parent: null,// 父组件实例,本文例子为null
    appContext, // 全局上下文
    type: rootVnode.type, // 节点类型
    subTree: null, // 组件内渲染VNode树
    render: null,
    proxy: null,
    data: {},
    props: {},
    setupState: {},
    // 继承全局组件和指令
    components: Object.create(appContext.components),
    directives: Object.create(appContext.directives),
    ctx: { _: instance }
  }

复制代码
ctx: 这个ctx 属性,是为了渲染模板的时候,将instance自身作为执行上下文
初始化组件实例相关属性
  // 设置模板渲染render函数
  const Component = instance.type // 组件options
  if (!Component.render && Component.template && compile) {
    // 编译模板为render函数
    Component.render = compile(Component.template)
  }
  if (!Component.render) {
    throw Error('请检查模板是否正确')
  }
  instance.render = Component.render
  // 设置render 函数调用时的渲染上下文
  instance.proxy = new Proxy(instance.ctx, {
    get({ _: instance }, key) {
      const {  setupState } = instance
      // setupState 优先
      if (setupState[key] && hasOwn(setupState, key)) {
        return setupState[key]
      }
    },
    set({ _: instance }, key, val) {
      const { setupState } = instance
      if (setupState[key] && hasOwn(setupState, key)) {
        setupState[key] = val
      }
    },
  })
  const { setup } = Component
  // 调用setup函数
  if (setup) {
    const setupResult = setup()
    // 这里设置响应式
    instance.setupState = reactive(setupResult)
  }
复制代码
代码中compile 为编译函数,具体实现原理模板编译原理
根据本文的例子,得到render、setupState:
// _c 为创建VNode
instance.render = function () { return _c('div',
          {class: "parent"},
          [_c('div',
          {class: this.data.class},
          [_c('text', {value: '组件渲染内容'})]
        )]
        )
      }

instance.setupState = {
  dataProxy: {
    class: 'demo'
  }
}
复制代码
渲染组件内容
 // 渲染组件 effect 为响应式相关函数,用于依赖收集,并且设置了组件update的更新函数
 // effect 等价于vue2.x 中的 Watcher
  instance.update = effect(function componentEffect() {
    // 渲染组件模板,得到组件子树VNode,同时完成依赖收集,instance.proxy 其实代理就是组件自生component
    const subTree = (instance.subTree = instance.render.call(instance.proxy,  instance.proxy))
    // 根据组件子树VNode ,渲染组件内容
    mountElement(subTree, container, anchor, instance)
    rootVnode.el = subTree.el
    instance.isMounted = true
  })

// 根据VNode 创建具体 Dom元素
// container 父Dom 元素,在我们例子中为 id="app" 的元素
const mountElement = (vnode, container, anchor, parentComponent) => {
  const { type, props, children } = vnode
  let el
  // 文本节点特殊处理
  if (type === 'text') {
    el = vnode.el = document.createTextNode(props.value)
  } else {
    el = vnode.el = document.createElement(type)
    // 递归渲染挂载子树
    if (children) {
      mountChildren(vnode.children, el, null, parentComponent)
	}
	// 这里的 props 表示是Dom元素上的props
    if (props) {
      for (const key in props) {
         el.setAttribute(key, props[key])
      }
    }
  }
  // 插入DOM中
  document.appendChild(container, el, anchor)
}
复制代码
本文例子中根组件 得到的subTree如下:
{
	"type": "div",
	"props": {
		"class": "parent"
	},
	"children": [{
		"type": "div",
		"props": {
			"class": "before"
		},
		"children": [{
			"type": "text",
			"props": {
				"value": "组件渲染内容"
			},
			"component": null,
			"appContext": null
		}],
		"component": null,
		"appContext": null
	}],
	"component": null,
	"appContext": null
}
复制代码